Hi all -
It's been a while, but I'm back! Well, sort of.
I've started a new blog, more in line with my current goals - and you can find healthy, RP-friendly recipes that aren't boring. Because let's be real - I can't eat boring food.
So feel free to join me over at Six Pack or Bust!

Monday, October 16, 2017
Sunday, November 24, 2013
Vanilla Souffle

I'm not much of a sweets kind of person. My husband, on the hand, could eat a piece of cake for breakfast and wash it down with a bowl of ice cream every day if he could.
But when I do have dessert, I like it to be light and tasty. That's where this vanilla souffle comes in. It's delicate, but complex in flavor. Simple, but a show stopper. Obviously, I waited a little too long to take pictures because it started to deflate after a bit. But it still tasted wonderful, and in the end, that's what really matters, right? Right.
Ingredients:
3 tablespoons flour
3/4 cup milk
1/3 cup sugar, plus 1 tablespoon
4 egg yolks
2 tablespoons unsalted butter
4 egg whites
1/8 teaspoon salt
2 tablespoons vanilla
powdered sugar, for dusting
Preheat oven to 400 F.
Grease the inside of 4 small ramekins with butter.
In a small saucepan, combine the flour, milk, and 1/3 cup sugar. Slowly bring the mixture to a boil, whisking frequently to prevent lumps. When the mixture begins to thicken, remove from heat and let cool.
Whisk in the egg yolks, one at a time and continue until all yolks are incorporated. Beat in the 2 tablespoons of butter.
In the bowl of a stand mixer, whisk the egg whites, salt, and remaining tablespoon of sugar until stiff peaks form.
Fold the meringue into the egg yolk mixture and then stir in vanilla.
Divide the mixture between the ramekins, filling them about 3/4 of the way full.
Place the ramekins carefully on a baking sheet and transfer to the oven. Turn heat down to 375 F and bake for 25-30 minutes or until souffle has risen and is golden brown.

Carefully remove from the oven and dust with powdered sugar. Serve immediately.
Hope you guys have a great Thanksgiving week!
Wednesday, November 13, 2013
Chocolate Peppermint Mousse

It seems that Christmas gets thrown in our faces earlier and earlier every year. I remember when I didn't see a single Christmas decoration or hear a note of a single Christmas song until the day after Thanksgiving. This year, I pretty much woke up the day after Halloween to aisles flooded with Christmas candy and knick knacks - the alarm set to a horrible country radio station (sorry for all you country music fans) unforgivably playing Christmas tunes. I mean, can't we give Thanksgiving a chance, first?
Well, I guess if you can't beat 'em, join 'em.
My husband loves the taste of peppermint-anything. Throw chocolate in the mix and he's in heaven. So since it's pretty close to the big guy's birthday, I decided to whip up a little dessert to put a smile on his cute face.
Ingredients:
4 egg yolks
3/4 cup sugar, plus 1 tablespoon
1/4 cup Peppermint Schnapps
6 oz. semi-sweet or dark chocolate
1/4 cup coffee
6 oz. unsalted butter, softened
4 egg whites
1/8 teaspoon salt
whipped cream for topping, optional
Combine the egg yolks and 3/4 cup sugar in a medium, stainless steel bowl. Beat with a hand mixer until pale yellow and the mixture allows ribbons to form.
Beat in the Peppermint Schnapps until combined.
Set up a double boiler on the stove, being careful not to let the bottom of the bowl touch any water (you only need about an inch of water in the pot). Beat the mixture until it starts to thicken and slightly foams up. The mixture should be warm to the touch. Set mixture aside while you melt the chocolate.
In another medium, stainless steel bowl, combine the chocolate and coffee. Set the bowl over the double boiler and stir until chocolate is completely melted. Remove from heat and stir in the butter.
Slowly pour the chocolate mixture in with the egg mixture and beat until all the chocolate is incorporated.
In the bowl of a stand mixer or using a hand mixer with the whisk attachment, combine the egg whites, salt, and remaining tablespoon of sugar. Whisk until stiff peaks form.
Fold the meringue in with the chocolate mixture until all is incorporated. Divide the mixture into serving dishes and refrigerate for at least 2 hours.
When ready to serve, top with whipped cream and sprinkles.
This is definitely a tasty treat. The peppermint doesn't over power the chocolate at all, but instead, it accentuates it to create quite the delicious bite!

So if you're looking for something to serve at one of the many holiday dinner parties this year, look no further! Enjoy the rest of the week, guys!
Monday, October 28, 2013
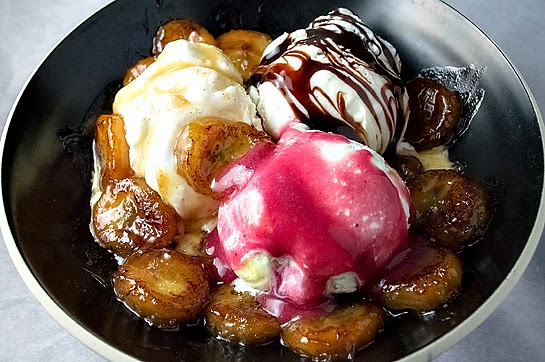
Bourbon-Raspberry Sauce

There's one thing that every Kentuckian knows. Whether they drink it. Cook with it. Collect it. Kentucky knows Bourbon. After all, it's our unique limestone shelves that filter our waters to produce the best bourbon in the country, if not the world.
My husband, is definitely a fan of the drinking aspect. Me, on the other hand, I love to cook with it. This raspberry sauce can be used savory or sweet. In this instance, it turned a normal banana split sundae into a phenomenal one.
Ingredients:
2 pints fresh raspberries
3-4 sprigs of thyme
zest from 2 lemons
juice from 2 lemons
1/2 cup water
1/2 cup brown sugar
1/4 cup sugar
1/4 cup bourbon
In a medium saucepan, combine the raspberries, thyme, lemon zest, lemon juice, water, brown sugar, and sugar. Cook the mixture until the raspberries start to soften and the liquid is reduced by half.
Add the bourbon and set aflame to burn off the alcohol and concentrate the flavor. Continue to cook until mixture starts to become syrupy.
Add mixture to a blender and puree until smooth. Strain mixture of seeds and thyme. Let cool to room temperature before using.
I could just eat spoonfuls of this stuff by itself, it's so good!
Wednesday, September 18, 2013
Salmon Mousse

It's been quite a while since I last posted. I thought working throughout the week during the day would give me more time, but apparently my time is still limited. But I'm a lot happier when I can walk out of work and still have plenty of daylight to enjoy!
Anyway, don't worry, I've still been plenty busy in the kitchen! We had a little get together for a game night not too long ago and served this really delicious salmon mousse as a snack and it was gone before we knew it!
Ingredients:
1 lb. salmon fillet, skin removed
1 small shallot, minced
1 tablespoon unsalted butter
2 cups fish or seafood stock
1 cup water
1 carrot, peeled and roughly chopped
2 sticks of celery, roughly chopped
1 onion, diced
1 tomato, diced
1 tablespoon black peppercorns
1 bay leaf
3 tablespoons Madeira
1/8 teaspoon nutmeg
1/2 cup heavy whipping cream
salt and pepper, to taste
crackers or crostinis, for serving
fresh dill, for garnish
In a medium saucepan, melt the butter under medium high heat. Add shallot, carrot, celery, and onion. Cook until just translucent.
Add the fish stock, water, tomato, black peppercorns, and bay leaf.
Bring pot to a boil, then reduce to a simmer. Add salmon. Poach until just starting to flake, about medium.
Remove the salmon from the liquid and let cool.
In a food processor or Vitamix, add salmon, madeira, nutmeg, and heavy whipping cream. Blend until smooth or at desired texture for dip. Season with salt and pepper, to taste. Serve with crackers or crostini and garnish with small bits of fresh dill.
This is definitely an easy winner in my book! So simple and fast, you'll have a tasty dip in no time! Definitely a good choice for those football watching parties, too!

Have a great rest of the week guys!
Thursday, August 15, 2013
Chicken Gyros w/ Pickled Beets

State Fair Season is right upon us. In Kentucky, the State Fair starts today and goes until Aug. 25. One of our favorite things to do at the fair is eat... obviously. And one of our favorite booths to visit is definitely one that offers Greek gyros!
Every now and then, we'll divulge at home with gyros of our own. They're so easy, and versatile - not to mention completely delicious!
For these, I pickled some beets, made some orange-cucumber tzatziki, and loaded up on some grape tomatoes and lettuce. Pair those accompaniments with some marinated chicken, and you've got a meal!
Ingredients:
Chicken Marinade:
1 lb. chicken tenderloins
1/2 cup soy sauce
1/4 cup brown sugar
1 tablespoon sesame oil
juice from 1 orange
juice from 1 lemon
2 tablespoons rice wine vinegar
1 tablespoon red chili flakes
1/2 cup olive oil
Pickled Beets:
2 small red beets, peeled and julienned
1/4 cup sugar
1/4 cup water
1/4 cup rice wine vinegar
hard spices - for these, I used a combination of mustard seeds, crushed bay leaf, star anise, cloves, and juniper berries
Pitas
Grape Tomatoes
Grilled Onions
Lettuce
Homemade Tzatziki
Any other toppings you want!
For the marinade: In a large bowl, combine the soy sauce, brown sugar, sesame oil, orange juice, lemon juice, rice wine vinegar, chili flakes, and olive oil. Stir until sugar is dissolved. Add chicken to the bowl and toss to coat. Refrigerate for at least 6 hours.
For the beets: In a small saucepan, combine the sugar, water, rice wine vinegar, and spices. Bring mixture to a boil and stir until sugar is dissolved. Let cool slightly.
Place julienned beets in a medium bowl and strain pickling liquid over top. Let pickle for a least 30 minutes.
Preheat a propane or charcoal grill to high heat.
Remove chicken from marinade. Spray grill with non-stick spray or wipe grates with oil. Grill tenderloins until white throughout.
Heat pitas on grill until marked.
To assemble, place one or two pieces of chicken in the center of each pita. Top with lettuce, grape tomatoes, onions, pickled beets, and tzatziki (I simple combined plain greek yogurt, orange juice, and finely diced cucumber). And you've got yourself one heck of a gyro!

Have you ever made gyros at home? How do you like yours?
Have a great weekend guys!
Thursday, August 1, 2013
Sauteed Chicken Breast w/ Roasted Beets, Celery Root, Apples, & Pears

I recently became the proud owner of a Vitamix blender. Working in the restaurant industry, I've been exposed to these blending beauties for quite some time, but never splurged on one for our home. That day finally came about a month or so ago. And what a glorious day it was.
Andy seems to think it's main use is to make a variety of milkshakes. I constantly find quarts of ice cream in the freezer labelled "milkshakes, please". But for me, it means I can make silky smooth purees, vinaigrettes, and a plethora of other culinary delights.
So for this dish, I paired the savory roasted items with a tart parsley-dijon vinaigrette and a smooth parsnip puree. Andy cleared his plate in a matter of minutes and said that I could make this dish over and over again without any complaints from him. Sounds like a winner in my book!
Ingredients:
2 skin-on chicken breasts
salt and pepper
olive oil, for sauteeing
1 red beet, peeled and diced
1 celery root, peeled and diced
1 pear, peeled and diced
1 apple, peeled and diced
1 large shallot, diced
olive oil, for tossing
salt and pepper, to taste
Parsnip Puree:
1 lb. parsnips, peeled and sliced into 1/4 inch pieces
2 cups milk
1 cup heavy cream
4 tablespoons unsalted butter
salt and pepper, to taste
Parsley-Dijon Vinaigrette:
1 cup fresh parsley
juice from 1 lemon
4 tablespoons dijon mustard
2 tablespoons honey
2 cloves garlic
1/4 cup apple cider vinegar
1 to 1 & 1/2 cups vegetable oil
salt and pepper, to taste
Preheat oven to 425 F.
In a medium bowl, toss the beets, celery root, pear, apple, and shallot with olive oil to coat. Season with salt and pepper. Place in a single layer on a baking sheet and roast for about 20-25 minutes, turning vegetables and fruit halfway through.
For the parsnip puree, combine the parsnips, milk, heavy cream, and butter in a medium sauce pot. Bring to a boil, then reduce to a simmer and cook until the parsnips are fork-tender.
Strain the liquid from the parsnips, but reserve it, don't throw it away.
Place the parsnips in a Vitamix (or you can use an immersion or regular blender, too) and blend on low speed, adding the reserved liquid until you get your desired texture. Season with salt and pepper, to taste.
For the vinaigrette, place the parsley, lemon juice, dijon mustard, honey, garlic, and apple cider vinegar in Vitamix (or regular blender). Turn on medium speed and slowly add the oil until completely emulsified. Season with salt and pepper, to taste.
Heat a large saute pan under medium high heat and add oil. Season both sides of chicken breasts with salt and pepper. Add the chicken to the pan, skin-side down. Cook until skin is golden brown, then flip chicken over and cook until white throughout.
To plate, place a good amount of the roasted vegetables on the center of the plate. On one side, spoon some of the vinaigrette. On the other side, place a good dollop of the parsnip puree. Place the seared chicken breast, skin-side up on top of the vegetables.
And there ya have it! One tasty chicken dish!

Hope you guys have a great rest of the week/weekend!
Subscribe to:
Posts (Atom)